Installing 3dsMax Hauzd Script
Here you can see how to install the Script that will export all your Project modelling in a Single Click from 3dmax to the Engine.
Inside your Hauzd folder you should have the following structure:
If so we can now move to 3dsMax to setup the script.
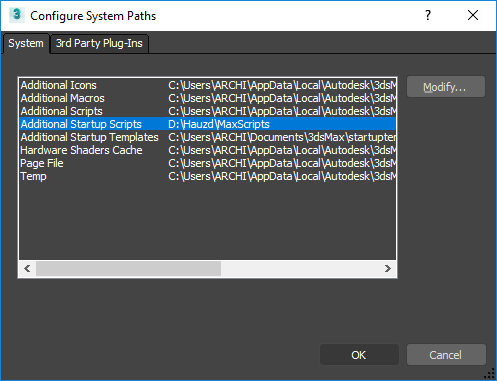
Inside 3dsMax, you must go to Customize/Configure System Paths:
Now, Inside this window, you must select " Additional Startup Scripts " and Click "Modify"
This will send you to choose a new folder for your additional scripts for 3dmax startup, and you must choose your
C:\Hauzd\Maxcripts folder, or wherever you have your Hauzd folder stored and click " Use Path "
Once you changed your folder you can Click Ok, and Restart 3dsMax (Close it and Open it)
Once you ReOpen 3dsMax you will see a new tab with the Hauzd Script Buttons
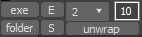
So here is the explanation for each Button:
exe Button This is the button you will use to run the engine directly from 3dsMax
exe Button This is the button you will use to run the engine directly from 3dsMax
E Button This will be the Button that will export your whole project modelling (which must be inside a layer called " EXPORT " )
Directly into the engine.
folder Button This button access the folder for your current opened project.
S Button This exports whatever you have selected, can be used for quick tests of individual objects inside the engine.
unwrap Button This Button creates an automatic UVMap for the Lightmap calculation inside the engine, it uses the values above, the default " 10 " is the minimum angle
S Button This exports whatever you have selected, can be used for quick tests of individual objects inside the engine.
unwrap Button This Button creates an automatic UVMap for the Lightmap calculation inside the engine, it uses the values above, the default " 10 " is the minimum angle
for making cuts on the UV mapping for your mesh, whatever polygons next to each other that create an angle of 10 degrees or less, will be cut in the UVmap
you can increase this angle for when your mesh is creating a curve or some round shape, so it can UV together more of the polygon surface, for example
an angle of 70 or 80 will create a contiuous light bake on a curved object and it wont look faceted.
The number " 2 " above should never be changed, it stands for the UV Id that the engine uses to calculate the lightmap on your object.
Related Articles
Introduction to Hauzd - Part 2
VERY IMPORTANT NOTICE If you´re using an editor version 1.06.130 or newer, you can import your scenes faster: • You DON'T need to use the prefixes geom_ or obj_ • You DON'T need to UV unwrap channel 2 of every geometric element. • You DON'T need to ...Installing Illustrator Hauzd Script
Here are the steps in order to install the Hauzd Illustrator Script which will make you able to export your User Interface from your canvas to the Engine. Inside your Hauzd folder structure, enter to the AI Scripts Inside you will see the Illustrator ...How to install hauzd Scripts?
Let´s learn how to install hauzd Scripts! hauzd Max Script Download hauzd Max Script Open 3ds Max 1.On the top bar, go to Customize→Configure System Paths... 2.Double Click in Additional Startup Scripts to open your default folder for Start up ...Primeros Pasos en hauzd - Creando escenas de interior con el Wall Generation Script
Por favor, no saltes ningún video, todos son relevantes para el proceso Parte 1: Primeros pasos, Environment Local y Wall Generation Script Wall Generation script - Themes, Ids en imágenes ...Introduction to Hauzd - Part 3
Para ver el video con subtítulos en español , actívalos en youtube. Introduction to Hauzd - Part 3 Welcome to the third part of our Learning Curve! Missed the second? GO HERE. in this Tutorial we will learn how to assembly our scenes and use hauzd ...