Library files inspection & conventions
IMPORTANT RULES
Your are one of the artists with the important work to process and create hauzd 2.0 assets! Congrats!

1. Keep Names Easy to identify and hard to accidentally overwrite. Both in file names (.png, .jpg, .max, .fbx...) and inside 3D file structure (layer names, object names, material names...)
2. Package can consist only of 2 different types of grouping:
1. Fbx/Max package containing a single unique mesh with multiples copies of the same geometry. Those copies can have different materials and maps.
For example, a single car model with 5 exact mesh copies and its 5 material/color variants, in a more specific example A Ford Mustang and its variants, a red Ford Mustang, a Yellow
Ford Mustang, a white Ford Mustang....
2. Fbx/Max package containing different meshes or geometry sharing only one single material.
For example a set of dining decoration and plates using a single ceramic material.
In both cases, they are sharing one aspect, the geometry, or the material:
- One geometry and multiple copies of that geometry with different material.
- One Material and a different geometries.
Folder Structure:
Final Files for each set is:
One Fbx containing the objects
One folder containing the source/editable file and all the texture maps
Set Categories, this will be used at different parts of the naming convention.
Exterior (this shouldn't part of the file name):
-Car
-PlantExt
-FurExt
- Street
Interior (this shouldn't part of the file name):
- Bed
- Bath
- Kitchen
- Appliances
- Tech
- Lamp
- Sofa
- IntPlant
- Gym
- Office
- Kids
- Deco
Generic (this shouldn't part of the file name):
-PlantGeneric
Naming
Avoid names:
texture.jpg, maptext1503.png, scene15.max, objects_vehicle.fbx.
DO NOT USE SPECIAL CHARACTERS IN FILE NAMES, such as @,_/-,*() this characters should be reserved, to be used to declare prefixes obj_name and tags name(TAG)
Inside Max: Object1530, spline90, someOtherCar, Material1530
Textures: Gray.jpg, birmap15.png
Correct name convention for files:
Editable Max files and final Fbx:
(Set)(ObjectGroup)(C)
Examples:
(Set): Sets would be the category of our object
(ObjectGroup): Name the asset(s) in a simple word (Example: Beds, Chairs, Tables, Carpets...)
(C): Stands for Character, instead of numbers this will be the "separator" between objects of the same category, for example, instead of using "chair001, chair002...", please use alphabetically "chairA, chairB, chairC...", the reason for this is that the editor will also use numbers when using same object multiple times, so when having 3 objects called "chair001", you may also end with "chair0012" and "chair0013".
Object inside Max/Fbx:
Object should be inside of the EXPORT layer, with a simple white plane that would work as a "floor" and should be named "base" OUTSIDE of export layer
prefix_(Object)(C)(LOD)(Other Tags)
prefix for objects should always be obj_
(Object): Name the asset in a simple word (Example: Bed, Chair, Table, Carpet...).
(C): Stands for Character, instead of numbers this will be the "separator" between objects of the same category, for example, instead of using "chair001, chair002...", please use alphabetically "chairA, chairB, chairC...", the reason for this is that the editor will also use numbers when using same object multiple times, so when having 3 objects called "chair001", you may also end with "chair0012" and "chair0013".
(LOD) Level of Detail mesh/Pixel size information
(Other Tags) Tags such as Bake resolution, NOBAKE, sorting... etc.
Recommended LOD values
Once we have our base object ready to go with all requirements, that object will be our main LOD (Highest Geometry), first lod should start with 500 and follow this pattern:
-obj_XXX(BAKE=XXX) (100%)
-obj_XXXLod0(LOD=500) (80%)
-obj_XXXLod1(LOD=300) (60%)
_obj_XXXLod2(LOD=100) (40%)
-obj_XXXLod3(LOD=5)(20% - 30%)
Depending on the object, you can skip 300 if the object is too small or it doesn't have too much geometry.
Texture maps:
(Object)(Description)((Map)).
Examples:
Bench1RubberA, BedPurpleFabricA.jpg, BedGenericFabricN.jpg
(Object): Name the asset in a simple word (Example: Bed, Chair, Table, Carpet...).
(Description): Can describe material in 2 o 3 words (BlackPlastic, PinkRubber, SquaredFabricSheets)
((Map)): In parenthesis, the name of the map following this structure:
-Normal: XXXXX(NORMALMAP)
-Roughness: XXXXX(ROUGHNESSMAP)
-Metallic: XXXXX(METALLICMAP)
-Opacity: XXXXX(OPACITYMAP)
2D OBJECTS
planObj_:
prefix_(Object)(C)Everything should be exactly the same as its 3d counterpart. The only thing that will change is the prefix,
prefix should be planObj_
Easiest way to create it is using adobe illustrator
You can trace simple lines shaping the outer Silhouette of the object
When Saving it, do it as a Illustrator 8 format
You can now import the .ai file into 3ds max and have this result:
Scale the elements properly and assign a rectangular renderer to the spline, values for Width is the most important one, we need to keep consistency with all elements,
if you have scaled the spline, remember to apply resetXForm to apply transformation, otherwise, rendered line will be relative to its distorted scale.
Remove the Z mesh faces, leaving the object as a single face object, normal direction should be pointing up
Material should be a simple white material with 1.0 Roughness, 1.0 Opacity, 0.0 Metallic
Inspection Rules and error spotting
Activate Backface Culling on all objects before the inspection
Linking Objects
Tags for Library Assets
VCOLOR=BONECOLOR
When creating prop/assets, you can use Vertex Color to "create slots for material editing".
After a library is imported, the default behavior is that artists will be able to see all materials and they can also modulate the color using the color picker.
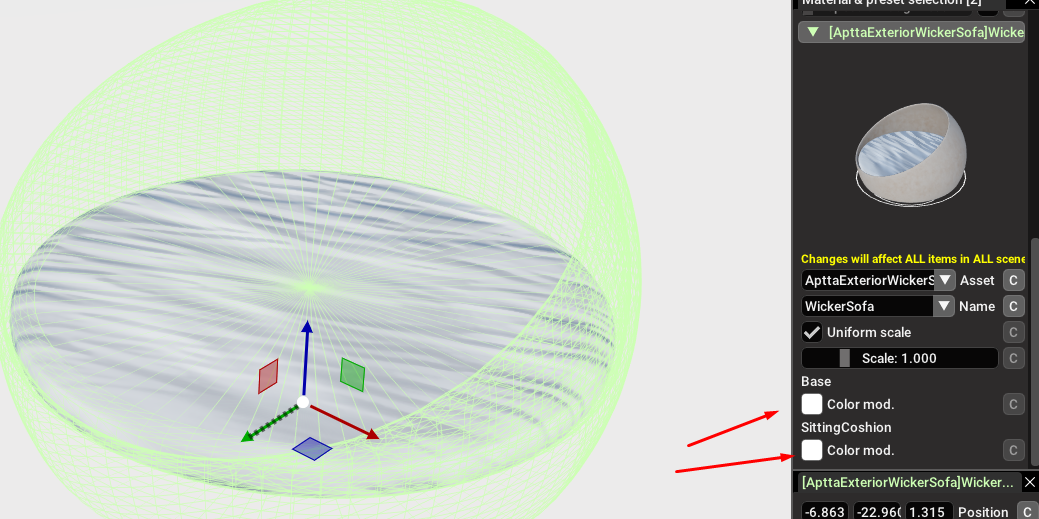
To make this technique work in the most efficient way possible without creating more drawcalls in the scene, we need to use this tag in the object to mark it for the use of this feature.
After this, you need to Vertex Color the desired geometry to "separate the material" and expose it as a different material.
The Red channel will be the "index" of this material, can be within the ranges 0 and 15. Use this number in an organized manner start number is 0 and last number is 15, do not skip numbers or indexes.
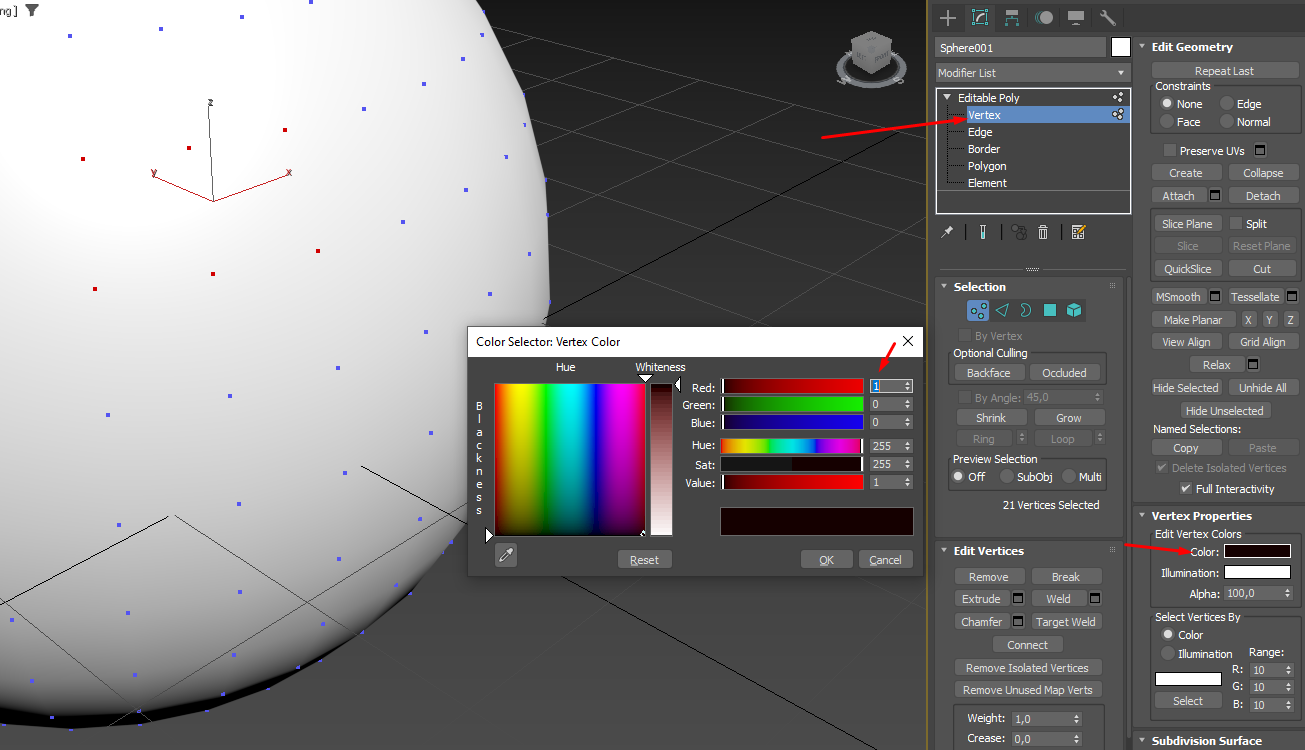
In this example, index used is 1
After creating all the materials slots you need, you can import again the library asset and you or any artist will be able to modify the marked sections.
Related Articles
Procesos Props y Assets
Bienvenid@ a hauzd! En los siguientes pasos te llevaremos por los procesos básicos del proceso de creación de props/assets Pre requisitos: Google drive: https://www.google.com/intl/es/drive/download/ Zoho Work Account 1. Organización Te crearemos una ...Introduction to Hauzd - Part 2
VERY IMPORTANT NOTICE If you´re using an editor version 1.06.130 or newer, you can import your scenes faster: • You DON'T need to use the prefixes geom_ or obj_ • You DON'T need to UV unwrap channel 2 of every geometric element. • You DON'T need to ...Information required to create a 3D presentation (ask your client to fill this form)
This file explains the information required to start a project. You should ask your client to fill all the fields and send it back to you with all the files needed.Scene Requirements
Please follow this instructions to achieve all hauzd scene requirements, read carefully each of the items, all of them are critical in the process. General Criteria Rules - Making a model too low poly is as bad as making it too high poly. Make a ...Walls Generation Script
Hello Everyone! Here you have the complete Video Training for our Walls Generation Script, which would be greatly useful once you start modelling your FloorPlan Scenes. The Script Automatically creates your walls out from splines you trace from the ...